Showing posts with label Random Thoughts. Show all posts

Wednesday, July 16, 2014

Keep Your Sleeves Up

Have you ever struggled keeping your sleeves up? Well, with the weather we are in, it is time to bring out all the nice and cozy long sleeved shirts and sweaters. But we all know that work will still be the same no matter the weather, so we tend to roll up those sleeves for us to be able to work faster and more efficiently. 

The challenge is keeping those sleeves up. As we wear it through the day, fabric gets loose and stretched and would sometime roll back down. The solution - just a handy dandy rubber band! Here's how to wear it.

In the morning, your sleeves are still quite tight. Not a lot of pulling and tugging yet.


By noon, it starts to fall back down...


It is time to bring out your rubber bands. :) Just one for each arm. This could be a thin hair scrunchy or any other thin elastic that you have. It shouldn't be too small because it may cut the blood flow in your arm and be quite uncomfortable. For average girl arm, you can use regular rubber band from your office supplies.


Just put it over your sleeves and place is in one of the folds rolling them up creates.


And, your sleeves are safe for work! :)

Tuesday, April 15, 2014

Sweet Sweet Snack

I found myself craving for something sweet today. I know we still have some vanilla ice cream in the fridge. It's too plain so I thought, "what could go with it?". 

I saw some bananas and chopped some.


added some vanilla ice cream...


some cinnamon...


and nutella.


I mixed a little bit, and here comes a sweet tooth sensation for my afternoon cravings.


Yum! =)

Tuesday, February 18, 2014

Homemade Crepe

There are times when you just gotta have something special for dessert. For those who love bananas and nutella together, this is definitely something for you.

Banana Nutella Crepe Recipe:

Crepe Batter:

3/4 cups all-purpose  flour, sifted
1 Tbsp. sugar
1 egg
1 cup milk
3 Tbsp. melted butter or vegetable oil

Procedure:


  1. Mix all dry ingredients. Mix all wet ingredients and gradually add to dry ingredients while stirring. This will avoid lumps in the batter.
  2. Heat a non-stick pan. Add a few drops of oil.
  3. Add 1/4 cup of batter and swirl the pan around so the batter will spread and have the right thickness(or thinness)
  4. Wait a few minutes (2-3), then turn it over.
  5.  Place on a big plate when cooked.

To assemble, just spread some nutella on top of the crepes and add sliced bananas. Fold and enjoy! :)

Make it healthy and use half whole wheat flour and half regular flour for the batter. Use fruits and jams for the filling and enjoy. :)


Wednesday, February 12, 2014

Andale by Agave

As you may now know, me and my hubby-to-be loved Mexican food. We got to try Andale by Agave one time. They are located at SM Aura Premier. I love that it is casual dining where you can enjoy the company of your friends, family or special someone. In my case, I brought my fiance. :)

We tried some of the staples (well, at least for us, these are the staples, haha!)

The Nachos. It came in different colors and I love that there are beef and beans in it. The portion is quite big so it is perfect for sharing.


The Quesadilla. To me, a Mexican Restaurant must have a good quesadilla. Andale's quesadilla has the ooey gooey goodness I am looking for.


The Burrito. I think the grande size can be bigger but the taste is good. I am not going to lie, I had better burritos. Though, this one is good to and as big as it is, it is also good to share.


Here is us enjoying the food. This photo was taken by one of the staff. She politely asks people on every table if she can take a photo for their Facebook account. We obliged and here is our photo grabbed from https://www.facebook.com/andalebyagave. (Pls. excuse the half eaten meal on our table)


Overall, Andale is a great place to hang out. The staff are nice and friendly, too. And being in a premier location at SM Aura, this is a great place to dine and drink after malling.

Saturday, February 8, 2014

Orale!

The word Orale is associated to something impressive in the Mexican slang. It is an expression similar to "what's up" but with varying connotations. 

I personally love burritos and quesadillas, same with my hubby-to-be. So, we are quite lucky to find good Mexican eats near the workplace. 

Orale is located in The Fort at BGC. I do not intend to make this article long. I just want to show you what great value for money Orale has to offer. 

Their Grande Burritos are gigantic! Almost as big as my arms and is less than P400 each. It is definitely good to share! We love their Barbacoa Wet Burrito. Makes me wanna shout out "Orale!" to the chef.


This is what the grande burrito looked like.


Quesadillas are also great here. I tried the mexican cheese and it is so good and gooey.


They have a simple menu. Just a few items but you can have it in different ways. Your burrito can be regular or grande, wet, or fried(chimichanga). And what goes in it varies, they have beef, pork, chicken, shrimp and fish (of course,  these were written in mexican. Otherwise. it won't be as cool-sounding). For the health conscious, they also serve salads. 

It is also great for hangouts since they serve mexican cocktails and beer too. 

Tuesday, January 21, 2014

Birthday Gift Ideas for the Bros

In line with the fact the today is my younger brother's birthday; I am incorporating you as I ponder upon what gift I should be giving him. As a side effect, you might also like the ideas that I would come upon in this post.

Of course, it is important to always consider the receivers wants and wishes in obtaining a gift. I hope you find this helpful.

1. Perfume/Cologne - My brother is the kind of person who doesn’t really buy his own cologne or perfume but uses one if available. If you have a brother like mine, this one could be a great gift. If your brother is a regular aficionado of scented spritz-y liquids, then you may want to give him something to add to his collection or introduce him to a new scent you found.

2. Wallet - You know how a man's wallet never leaves the back pocket of his jeans? They wear out easily because of this and by the end of the year some stitches are undone and it is no longer nice to look at. And it is not often for men to go shopping for a wallet so he might appreciate a new one.
3. Watch - This could be a little bit grand but hey, it’s his birthday. And watches makes great gift because they are useful. You just have to match the watch's appearance to the style of your bro and for sure you'll find it perfect on his wrist.

4. Basketball - It’s a good gift for the athletic and basketball fanatic brothers out there. But mine is not. I am still considering giving him a ball, though, to encourage him to become more fit and eventually be in a better shape.

5. Gadget - What kind of brother would not want a gadget of some kind? Especially for the music lover bros, anything for mp3 players (although, this function might always be included in their smart phones, it is still good to have something exclusive to use for jogging, working out, or just hanging out) to portable speakers will be appreciated. Gaming stuff also works if your brother is into that.

6. Toys - Boys will always be boys, find something that interests him. Even the big boys will love toys that remind them of their tender years. Some can also be fanatic for Lego and Hot Wheels. My brother is not very into collecting, but remote - control cars and helicopters still thrills him.

7. Backpack - Active lifestyle will require you to have some sort of pocket that holds all the things essential for your day. From cell phones to extra pair of socks, these backpacks will be something that your brother could use every day. Choose a cool design and you are good to go.
8. Book - Does your brother read? Sorry, but I find that sisters are the one into books. Still, I know my brother indulges himself to a light reading every now and then so I put it in my list. I'll just have to find a good book for him. J

9. Coin Bank - Particularly a good gift for someone who is a careful spender or a compulsive buyer. This will help him save up for any occasion.

10. T-Shirt - This is the last item because this is normally what I would get for him when I ran out of ideas. But he always loves great designs.

As you know, as I write this, I am pondering what would be a good gift this year for my younger brother. He has a particular interest in music and cars. I was hoping to find a Hot Wheels model of the car that he was dreaming to have but I gotta find a supernumerary idea if I would not be able to find one. I'll update you what I decide to go with. 

Update:
It was so funny because I was not able to find something I would really like to give my brother that belongs in the 10 items I've listed. I ended up buying a Rastaclat bracelet for him. It looks like this:

Rastaclat McFly Gray and Mint (photo grabbed from the internet)
But it was a good choice because he liked it so much. :)

Thursday, January 16, 2014

Gotta Love Project Pie

Our curiosity had us! So even if the line was too long and it seems like it will take forever before we get to eat, hubby-to-be and I braved it all and took our chance to try the pizzas at the "Project Pie" last Sunday for dinner. If we had gotten there earlier, I am sure the line will not be as long.

We are comforted to know that the line is moving at a steady pace. This means our wait will not be as long as we expected it to be. We were given a list of options and toppings. You'd be delighted to know that no matter how many toppings you choose, the cost will still be the same - Php 285. It is pretty affordable for a good pizza handcrafted by a pizza barista.

When we speak of baristas, we usually think Starbucks. And yes, ladies and gentlemen, I would dare say that Project Pie can be called the Starbucks of Pizza in terms of the method ordering.

There are 7 types of pizza in their menu, identified by the numbers 1 to 7. All you have to do is to pick one of the choices and customize it to your liking. You can also compose a completely different one if you like. So, it is virtually possible to have every topping they have on a pizza. I am pondering, however, if there is a limit as to how much of a certain topping can we put in a pizza. Maybe next time we go, I would ask the pizzarista (pizza+barista. Yeah, I made it up. Get over it.) that question.


There are also other options that you might want to order like salads and sweet pizza (like banana-nutella, strawberry-mango-nutella, and more) but these are not customizable. Their drinks are also always bottomless. Gotta love that, too.


Project Pie at Alabang 


Update:


Pizza Salad is ♥ and filling


This is a no. 6 with crumbled meat balls, bacon, jalapeno, and caramelized onions


Strawberry. Mango. Nutella. Yum :)

Easy Homemade Milk Tea

With the entire milk tea craze in the past year, it is still reassuring to know that you can easily create something similar if not better at the comfort of your own home with very minimal effort and ingredients.

This is something I learned last Tuesday night and can’t wait to share it with you, dear reader, even without the graphic assistance of photos.

Here is what you need:
  1. Milk of your choice, about 1 cup
  2. Tea in a tea bag of your choice
  3. Milk pan or just a regular pan
  4. Stove

Here's how to do it:
  1. Heat the milk in a pan.
  2. Dip in the tea bag when the milk starts to warm, stir a little.
  3. Let the milk come to a simmer (note: not to a boil or the milk will curdle)
  4. Pour in a mug. You may want to leave the tea bag in depending on how strong or weak you want the tea taste to be.
  5. You might also want to add some sugar depending on your liking.
  6. Enjoy.

It was so marvellously easy to make and tastes great too! Tito Ferds said it was an old trick they used to do when he was working as a crew in a cruise line ship.


With the cold/wet season we are in now, this is a perfect cozy drink to warm you up. 

Sunday, December 29, 2013

First Time for Razon's Famous Halo-Halo

Ever since I started working, I've been hearing about how people really really liked Razon's halo-halo.

I really don't know why it is that I did not get a chance to try it earlier. Today I was able to try it and here is my verdict. :]


I like that it is not too sweet. It has a creaminess to it that makes it delicious. There are only three ingredients in it but it still works. I think the three ingredients are sweetened banana slices, sweetened young coconut shreds, and leche flan on top. Of course, in order to be called halo-halo it also has shaved ice and milk on it too.

As delicious as it is, I find thay there is nothing super special about it. 

Sunday, December 1, 2013

For the Love of the Basketball Shoes 👟👞👠👢

I am not a huge basketball fan. Yeah, I know most of you are. It is really just not my thing. Though, I celebrated with all the LaSallians out there when they won the last UAAP.

What I love more than the game is the shoes! Yes! I am a girl who loves to wear sneakers. I find them as fashionable as heels plus it gives a bad ass feel to an outfit. 😎

Basketball shoes are becoming one of my favorite sneakers. They are engineered to support an active athlete who runs, jumps, and does some footwork. This means they are made to be sturdy and comfortable.  And who wouldn't want sturdy and comfortable shoes? It makes me feel good and confident knowing that I can stand and walk (sometimes in a hurry),  comfortably all day.

Here are my shoes that I might never be able to wear in the court but will definitely be wearing in many of my productive days. 😊

Air Jordan 1 "Highlight Reel"

Air Jordan 5 "Floridian"

Air Jordan 13 Pink and Gray

Other comfy shoes also includes...

Asics Gel Lyte III "Knicks"

Sunday, November 17, 2013

How Can We Donate?

The whole world knows about the devastation that Typhoon Yolanda/Haiyan has brought to central Philippines. And amidst the rubble, confusion, loss, and grief, there is only one thing to do - get up and start over - no matter how difficult or painful it is.

The whole world has given much to the Philippines to help rebuild the communities that were affected. Donations and support from different countries arrived during the past week. But I believe they need more. And as they say, "there is nothing so small that cannot help." Given that, here are some ideas on how you can give and share something to the victims of the super typhoon even if you do not have much to spare.

1. Not all help comes in monetary value, sometimes that most valuable of all doesn’t cost a thing. It is your time and volunteerism. Many survivors are coming in to Manila without anything on their name. Being with them and making them feel that they are not alone can mean everything. If you feel you are not talented enough for consoling the survivors, you can also volunteer on organizations to help prepare and repack relief goods.

2. I was told that the best donation you can give is cash because the people can use it where it is needed. And in the case of the cities that are affected, that need could range from food and water to nails and wood for the shelters. Also, it can be difficult to sort through piles of varied items and more time will be needed to get them repacked. An average Filipino worker may have just enough for himself but a little sacrifice can go a long way.
a.    Soda. If you normally consume 1 can or 2 of your favourite soda, try skipping them for a week. Just drink water. You can donate the money you saved and you also had started a healthier habit.
b.    Lunch Money. If you usually buy fast food for lunch, try bringing packed lunch to school or office for the week and donate the money you have saved. Make this a family effort to save more!
c.  Sacrifice one of your daily expenses that you can go without. It could be anything. 

3. If you do not have cash to spare, you can donate your effort. Start a fund raising activity within your community, school, or office. If everyone can give a little bit it can grow into something bigger than you expect. Never hesitate to contact foundations and agencies that help this cause so you know what to raise or collect in your fund raising because can have specific needs that they want to address.

There are many other ways to help. Volunteerism and sacrifice can go a long way. Let us all join our efforts to help Yolanda survivors.

P.S. Never force anyone to give. We don’t know what they are going through.
Here are some agencies/organizations which you can donate your money and effort to:

ALAGANG KAPATID FOUNDATION

Drop-off center is the Alagang Kapatid Foundation warehouse with the address: 730 Quirino Highway, San Bartolome, Novaliches, Quezon City, Philippines./p>
Cash and check donations may be sent at the following bank accounts:
Bank of the Philippine Islands-Ayala Avenue SGV Branch
1. Account Name: Alagang Kapatid Foundation, Inc.
(PESO) PHP ACCOUNT NO: 1443-0533-32
(DOLLAR) USD ACCOUNT NO: 1444-0214-85
Banco De Oro – BDO Makati Ave- Ayala Branch

2. Account Name: Alagang Kapatid Foundation, Inc.
(PESO) PHP Account No.: 00- 5310-41016-4
(DOLLAR) USD Account No.: 10-5310-46264-4


3. PAYPAL ACCOUNT
Username / beneficiary: alagangkapatid@news5.com.ph

Send a copy of the cash deposit slip to alagangkapatidfoundation.tv5@gmail.com or toalagangkapatidfoundationtv5@yahoo.com for record purposes.

CITIZEN'S DISASTER RESPONSE CENTER

Citizens’ Disaster Response Center (CDRC)
72-A Times St., West Triangle Homes, Quezon City, 1104 Philippines
Phone: +63 2 929 98 20
Fax: +63 2 929 98 22

Peso Account:
Account Name: Citizens’ Disaster Response Center
Bank: Metrobank, Examiner Branch, Quezon City, Philippines
Account No. 636-3-63600741-3

Dollar Account:
Account Name: Citizens’ Disaster Response Center
Bank: Metrobank, Examiner Branch, Quezon City, Philippines
Account No. 636-2-63600158-3
Swift Code: MBTCPHMM

Donate online:
Support our Typhoon Yolanda (Haiyan) Emergency Response

PHILIPPINE RED CROSS

Bonifacio Drive, Port Area, PO Box 280, Manila 1018
Telephone: 527-0000
Fax: 527-0857

E-mail: prc@redcross.org.ph

Monday, November 11, 2013

Chocoholic's Cake

I dread to bake such cake that seems to be so difficult to make. I haven't tried this before and knowing how fragile a moist cake can be, I hate to have to cut it in half to put frosting in between. 

When I finally had the courage, I found it most interesting that it is not as hard as I thought! Here is how I bake my very first moist chocolate cake.

I call it the "Chocoholic's Cake" because it is a moist sponge chocolate cake, filled with choco hazelnut spread, and covered with ganache. How sinful and delicious could this be?


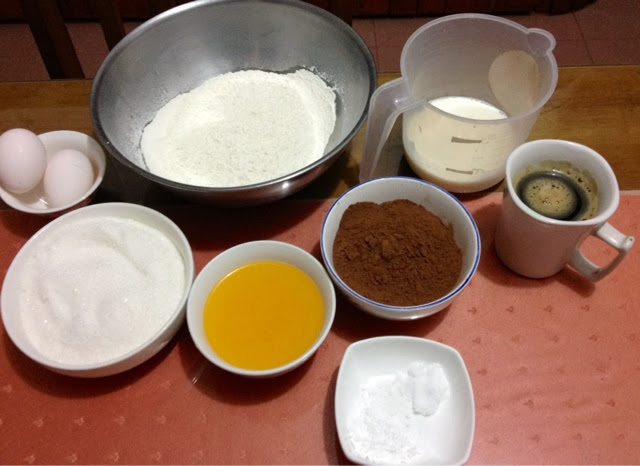
Ingredients:

I got the recipe from Foodess.com so kudos to a great recipe! I found a few things that I did not expect in the ingredients such as water and instant coffee. 

1¾ cups all purpose flour
2 cups granulated white sugar
¾ cup unsweetened cocoa powder
1½ tsp baking soda
¾ teaspoon salt
2 large eggs
1 cup buttermilk 
½ cup butter, melted
1 tbsp vanilla extract
1 cup hot coffee (or 2 tsp instant coffee in 1 cup boiling water)


Procedure:

Preheat your oven at 350 degrees F and prepare your pan by greasing and putting parchment at the bottom.

The first thing to do is to combine all your dry ingredients, that is, sugar, flour, cocoa powder, baking soda, and salt. Stir well so that the ingredients are incorporated.

Add the eggs, milk, vanilla, melted butter, and hot coffee a little at a time. This will make your batter very very runny. So don't panic if it seems to be the consistency of hot chocolate drink. 


If you have two round pans, it would be best to divide the batter among them so you need not to cut the cake afterwards. But I only have one pan so it'll have to make do. I put it all in and bake at for about 30 minutes

Once cooked, it will look like this - nice and springy. Unlike most cakes, you will not be able to tell if it is cooked by inserting a toothpick and see if it comes out clean. You are making a moist cake, it will never come out clean. You will know it is cooked if you can smell it and the top has risen nicely. Let cool for a few minutes before removing from the pan.


If  I will be gifting it, I will put it on a cake board. But since this is for my parents and siblings enjoyment, I just placed it on a nice plate.


Once it cooled completely, I cut it in half horizontally and added the choco hazelnut spread in between. I used a local brand but you can use Nutella if you like.

Surprisingly, it is not as difficult as I thought to cut the cake. It is perfectly moist, but there it still has the consistency of a cake. I cut it while still a little bit warm in the center.

Pls. excuse my foot, right there. (blush)


I made the ganache with the following ingredients:
500g dark chocolate
250g unsalted butter
180g heavy cream

Just pour it on top and spread. It is going to be messy so you better have your apron on. Spread on the sides of the cake as needed. Try to make is as smooth as you can.


Chill so the ganache may set.


And serve. :)


I hope you liked this post! :)


Tuesday, October 29, 2013

Cream Puffs Recipe

One of the favorite recipes I like to bake. It's definitely a crowd pleaser. :)


Pastry Shell (Pate a Choux) Ingredients:
200g Water
70g Butter
2g Salt
2g Sugar
140g Bread Flour, sifted
200g Eggs (est. 3 eggs + 1 yolk)

Pastry Cream:
450g Milk
50g Butter
40g Cornstarch
125g Sugar
4 Eggyolks

Ganache:
25g Heavy Cream
75g Dark or Bittersweet Chocolate. chopped

Procedure:

  1. Preheat oven to 400 degrees F. Grease baking sheet or pan.
To make the Pastry Shell:
  1. combine water, butter, salt, and sugar in a pot and heat on top of the stove until all butter is dissolved and bring to a gentle simmer.
  2. Lower the heat and dump all the flour. Stir until there is no dry flour. Stir until it gathers into a ball and does not stick to the sides. (*see notes)
  3. Transfer the cooked flour to a mixing bowl and stir until cooled.
  4. Add eggs one at a time. (*see notes)
  5. Put the batter into a piping bag and pipe to pans.
  6. Bake in the oven for 15-25 minutes.
 To Make the Pastry Cream:
  1. In a heavy bottom pot, Combine milk, butter, and half of the sugar. Heat on top of the stove until simmering lightly. (*see notes)
  2. While waiting to simmer, whisk together the rest of the sugar, eggyolks, and cornstarch until light.
  3. When the milk mixture simmers, scoop a few cups of the milk mixture to the egg mixture and continue to stir. This will temper the egg mixture to prevent it from forming into paste when added to the milk mixture.
  4. Pour the tempered egg mixture to the pot while stirring continuously.
  5. Stir until you reach the nappe consistency. (*see notes)
  6. Let cool. Stir from time to time to avoid forming the skin. (*see notes)

 To Make the Ganache:
  1. In a double boiler, heat the heavy cream.
  2. Add chocolate and let it melt in the cream. Stir constantly. It will help if the chocolate is chopped evenly so they melt all at the same time.

Assembly:
  1. Poke holes underneath the pastry shells 
  2. Fill pastry bag with pastry cream.
  3. Pipe into the pastry shells.
  4. Dip tops of the cream puff into ganache.
  5. Sprinkle your favorite toppings.
Notes:
Pastry Shells
  • When cooking the flour in the water mixture, you can remove the pot from the heat so you can work on mixing it more evenly without the liquid drying quickly. Then bring the pot back to the heat to continue cooking.
  • When adding eggs. make sure to mix until you can no longer see the egg before adding another one. Resulting mixture should be sticky and creamy in consistency.
Pastry Cream
  • Do not boil the milk mixture. Just let it simmer a little bit and add the egg mixture.
  • Nappe consistency is when you dip a spoon into the cream and you run your finger horizontally, what was left on the top does not run down the spoon.
  • The skin forms when left exposed and not stirred. When it is cool enough, you can cover with plastic wrap. Make sure the plastic wrap touches the cream.
Have fun baking! :)

Saturday, October 26, 2013

Ready For Red Velvet (Red Velvet Cake Recipe)


I have been searching for a good red velvet cake recipe. Most that I can find online are pretty much the same in terms of ingredients and measure so I guess there's a standard recipe for this kind of cake.

It's time to make some cake! Click here for the printable recipe. 

What you need:


For the Cake:
1/2 cup Unsalted Butter
1 1/2 cup White Sugar
2 Large Eggs
2 1/2 cups Cake Flour
2 Tbsp Cocoa Powder
1/2 tsp salt
1cup Buttermilk
1 tsp Vanilla Extract
2 Tbsp Red Food Coloring
1 tsp Vinegar
1 tsp Baking Soda


For the Cream Cheese Frosting:
1/2 cup Unsalted Butter
2 tsp Vanilla Extract
9oz Cream Cheese
2 1/2 cups Powdered Sugar

Notes:
It can be difficult to find buttermilk in liquid form if you are in the Philippines. Groceries usually only carries regular milk brands. Not to worry because you can add a tablespoon of lemon juice or white vinegar to regular milk to substitute real buttermilk. Buttermilk is tangy and adding lemon juice or vinegar will make up for the taste you are looking for with real buttermilk.

To Make the Cake:


Pre-heat oven at 350 degrees F. 

Combine flour, cocoa powder, and salt in a bowl. Use a whisk or spoon to mix. Set aside. Mixture should look like this.

In a mixer or separate bowl, cream together butter and sugar. Mix the butter until fluffy then add sugar and mix again. The resulting mixture should be grainy.


Add eggs. One at a time.


Add the vanilla.

Add the food coloring.


Alternately add your flour mixture and buttermilk. Beginning and ending with the flour mixture. I would normally add 1/3 of the flour then 1/2 of the milk first.


With this next step, you have to move quite quickly. Make sure you have your pan ready, greased and lined with parchment at the bottom.


Combine the vinegar with the baking soda. Quickly mix and fold into the batter.


My batter looks like this. Not too thin and quite smooth and creamy.


You can pour it all in an 8-inch pan. Or if you have two pans you can divide the batter among the two pans. This way you do not need to cut the cake in half when assembling. I only have 1 pan so I poured all the batter in. 


Level the top with spatula and place in oven to bake for 30-35 mins.

While that is baking, you can start your Cream Cheese Frosting.

Cream together butter and cream cheese until smooth.


Add sugar 1/2 cup at a time. Then add the vanilla.


Use more powdered sugar if the frosting is still too soft. It it becomes too thick, thin with a teaspoon of milk. 

You are looking for this consistency.


Check on your cake. You will know it is done when you put your finger on top and it springs back. The sides should also pull away from the pan a little bit.


Assembly:
 Let the cake totally cool first. If it is warm, the buttercream will melt. 

Once cool, cut it in two equal parts horozontally. I am not going to gift this cake so I just let it sit on a pretty plate instead of a cake board.


I also flatten the part that rose while baking and turn it over so that the bottom is on top. This will make a more level top.

Add frosting in between the two slabs of cake.


By this time you would notice how crumbly this cake is. This is because of the leavening used to make it rise that is the vinegar and baking soda.

Prepare to crumb coat. Crumb coating is important for you to ensure that no crumbs will show when you frost the cake.


Here is the crumb coated cake. Notice that some red on the sides are still showing.


It is best to chill for a few minutes before frosting. 

Here is the frosted cake. No special technique needed. Just gently spread your frosting and try smooth it as much as you can. It would also help if you frost the sides first then the top.


I don't have a large star tip so I used this small one to decorate it a little bit.


I just squeeze and pull to make these small details.


And our cake is done. :)